
The main contents of this article:
1. How to create a new ads?
2. How to turn on/turn of one ads?
3. How to modify an existing ads?
4. How to delete an existing ads?
5. How to see ads’s statistics?
* Note: To be able to create an ads on Trigger365.com, you first need to create an ads campaign for your website. To create an ad campaign, follow the detailed instructions in the following article: How to create a new campaign?
You also note, each ad campaign created from Trigger365.com will contain many ads.
Trigger365.com supports you to create up to 14 different ads types, specifically including: Notifications, Coupon, Live counter, Email collector, Last conversion, Conversions counter, Video, Social share, Random review, Emoji feedback, Cookie Notifications, Score feedback, Request collector, Coundown collector…
This article will guide in detail how to create Notification ads, other types of ads you do the same.
1. How to create a new ads?
To create a new ads from Trigger365.com, you should do via some steps:
+ Step 1: You have to login into Trigger365.com;
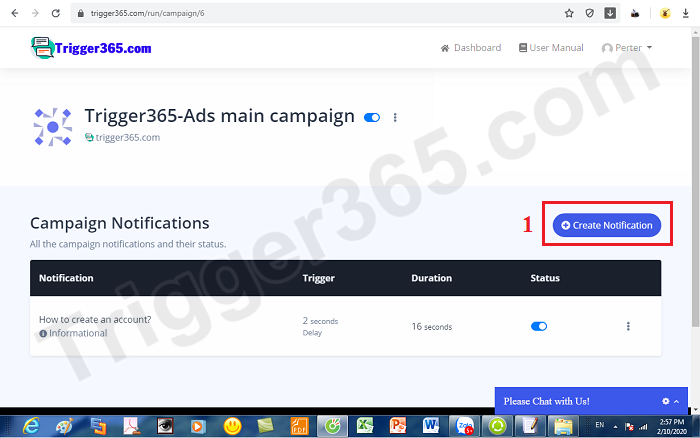
+ Step 2: In Dashboard window, you move to list of your campaigns and then you double click on Campaign that you want to create ads for it;
+ Step 3: In campaign notification window, you click on Create Notifications button (Like number 1 of the red rectangle in the bellow picture);
+ Step 4: In new window (Create new notification), you should do some things like:
-
- Name: You should input your ads’s name. It is used to distinguish it from other advertisements.
- Type: You choose one type of ads, in this article, I choose Information (It’s same notification ads);
===> Final, you click on Submit button to finish this step.
Note: Once you have chosen an ads style, so you will not be able to modified it later on.
+ Step 5: You setup the basic information for your ads by click on Basic tab in Settings area follow the bellow picture:
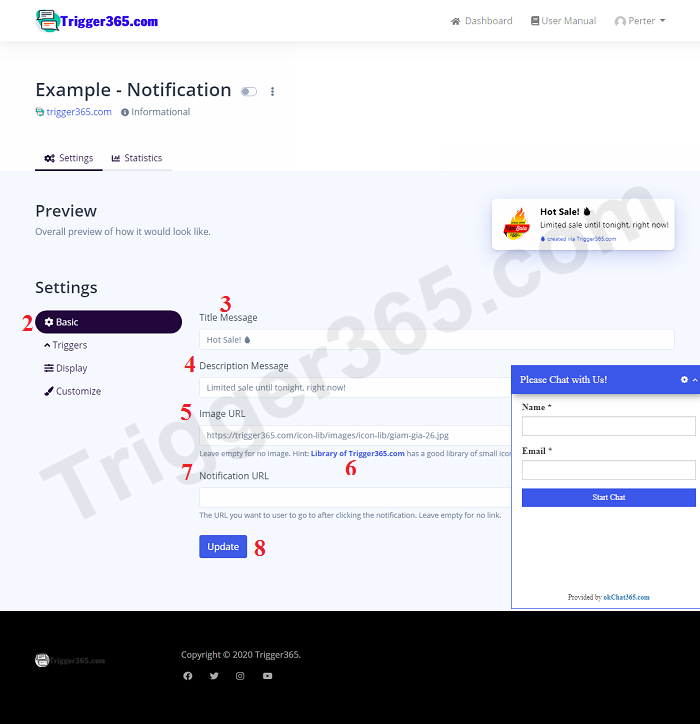
Explain details:
-
- Title Massage (3): It’ll show in title of your ads window (Like the small window to the right of the Preview area of the image above);
- Description Massage (4): Enter the message here. Often this section must include a call to action to encourage website visitors to click.
- Image Url (5): It’s image url of your ads. It’s be attractive your visitors to see and click it. You can get that url by click on “Library – Trigger365.com” (6) link to see the library of images of Trigger365.com after that you find the suitable image and click on it, after that you copy its url, next you past it in Image Url (5).
- Notification Url (7): Usually this section contains links to the detailed article that you want website visitors to read when you click on this ads. This can be a page describing details of your product or service or a funnel page to attract customers and we call this site your sales and marketing battleground.
==> Final, you click on Update button to save all basic information of your ads.
+ Step 6: You have to setup the Trigger function for your ads via click on Trigger tab like number 9 in the bellow picture:
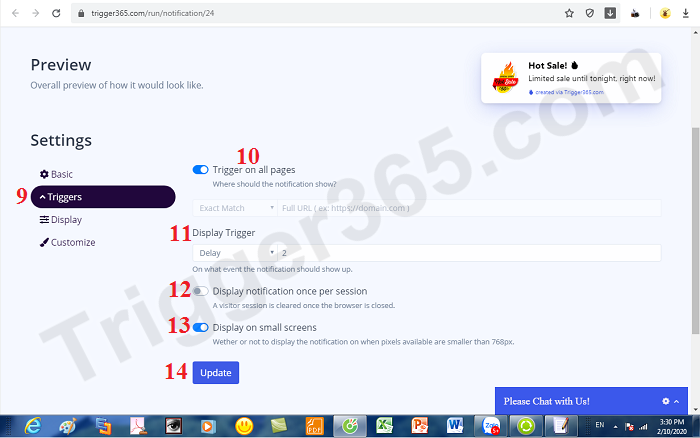
Explain details:
-
- Trigger on all pages (10): If this option is turn on, so your ads’s active in all pages of your domain that’s suitable with your campaign that contains your ads. If it’s turn off, so you have to paste your url of your page of your domain here. So your ads only show in that page. There are some options for this case: Exact Match (Your ads only show in the page that has url match with this url); Contains (Your ads show all pages that has url contains this url); Starts with; Ends with; Page contains.
- Display Trigger (11): You need to enter the number of seconds to wait for your ad to appear from the moment a website visitor loads successfully.
- Display notification one per session (12): This option is turn on so your ads’ll show only one time per session, opposite, it shows all time each visitor load your page;
- Display on small screens (13): Whether or not to display the notification on when pixels available are smaller than 768px.
==> After you setup finish, you click on Update button to save it and finish this step.
+ Step 7: You have to setup the display for your ads via click on Display tab:
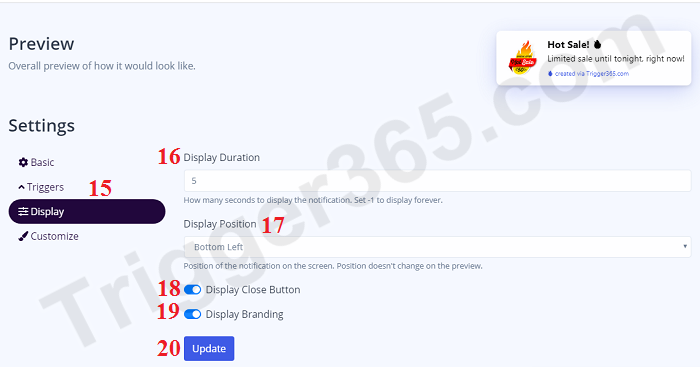
Explain details:
-
- Display Duration (16): You need to enter the number of seconds your ad exists on your site before it is hidden.If you enter the value -1 then your ad exists until the web page visitor to another page.
- Display Position (17): You should choose where to show your ads on the site.
- Display Close Button (18): Turn on/off the close button on your ads window.
- Display Branding (19): Turn on/off to display branding. In order to not display the brand name of Trigger365.com, you need to upgrade your account to the corresponding higher service pack, then if you disable this mode, the words “created via Trigger365.com” will not show up. on your ad window. You can follow the detailed list of Trigger365.com service packages at the following link: Trigger365.com’s Packages;
==> Final, you click on Update button to finish this step;
+ Step 7: You should custom the interface for your ads by click on Customize tab and then you should setup some options for your ads;
+ Step 8: Turn on for your ads
Usually when the ad is created, the status of the ad is deactive. Therefore it does not appear on your site. For ads to appear on your site, you need to turn it on by the following:
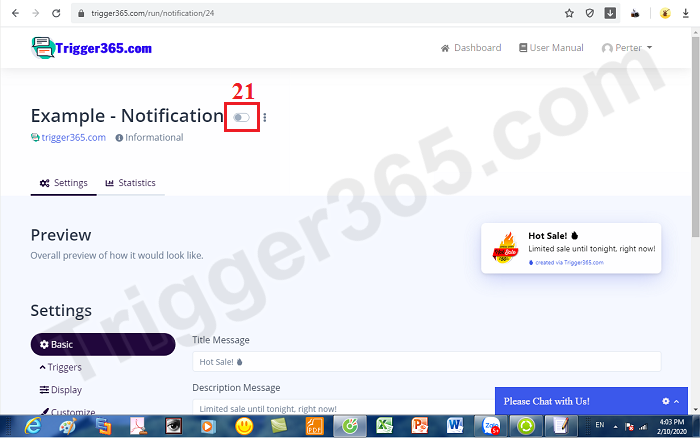
In the design window, you click on Status button like number 21 of the red square in above picture to turn on your ads.
==> Ok, You have just finish to create a new ads.
==> Now you can check it in your website that is suitable with this campaign and ads.
2. How to turn on/turn of one ads?
Your ad will only be displayed on your site when it is turned on, otherwise it will not appear.
To turn on / off ads, in the process of creating new ads, you follow step 8 in section 1 above.
In case the ad already exists, to turn it on / off you do the following:
+ Step 1: You move to List of Campaigns in Your Dashboard window;
+ Step 2: You double click on the campaign that contain your ads that you want to turn on/turn of it;
+ Step 3: In list of ads of your campaign, you click on Status button that’s suitable with your ads to turn on/off it.
==> That’s all!
3. How to modify an existing ads?
To modify an existing ads, you should do via some steps bellow:
+ Step 1: You move to List of Campaigns in Your Dashboard window;
+ Step 2: You double click on the campaign that contain your ads that you want to modify it;
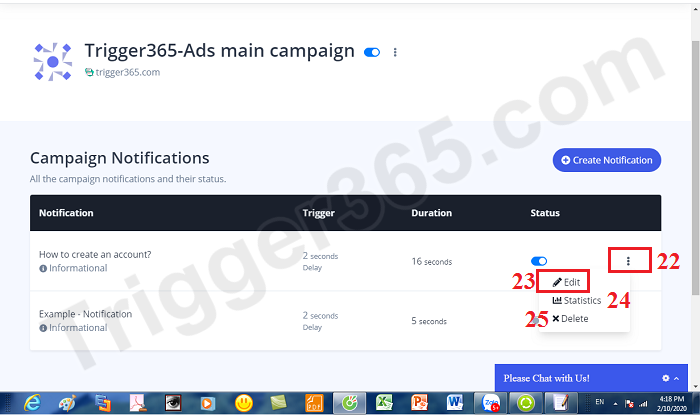
+ Step 3: In new window (It show list of ads of your campaign), you click on 3 vertical dots correspond to the ads that you need to modify (22). Next you click on Edit (23). You can do it follows picture:
+ Step 4: You should change all things that you want. Final you click on Update button to finish;
4. How to delete an existing ads?
+ Step 1: You move to List of Campaigns in Your Dashboard window;
+ Step 2: You double click on the campaign that contain your ads that you want to modify it;
+ Step 3: In new window (It show list of ads of your campaign), you click on 3 vertical dots correspond to the ads that you need to modify (22). Next you click on Delete (25) (Do it like above picture) => Choose Ok to finish.
5. How to see ads’s statistics?
+ Step 1: You move to List of Campaigns in Your Dashboard window;
+ Step 2: You double click on the campaign that contain your ads that you want to modify it;
+ Step 3: In new window (It show list of ads of your campaign), you click on 3 vertical dots correspond to the ads that you need to modify (22). Next you click on Statistics (24) (Do it like above picture).
==> Now you can see all behavior of your visitors with your website.